The information below has been synthesised from:
• Semalulu, Onesmus & James, Higenyi & rusoke, charles & Namayanja, Diana & niyibizi, george & etc,. (2017). The Sustainable Land Management Manual, Volume 1 final
• Mbora A., Lillesø J-PB., Jamnadass R. 2008. Good Nursery Practices: A Simple Guide. Nairobi. The World Agroforestry Centre. 36 pp
• Ministry of Water and Environment, Forestry Sector Support Department, 2020. A Guide for Tree Nursery Management
¶ Tree Nursery Establishment and Management
¶ Nursery Site Selection
Instruction 33: The location of the nursery site should take into consideration the following factors:
(i) Availability and ownership of land
(ii) Access – the nursery should be located near a road or accessible paths to allow easy transport of seedlings by vehicles.
(iii) Water supply – seedling production requires a lot of water to facilitate seed germination and growth. A nursery should, therefore, be established close to a permanent source of water.
(iv) Gentle slope – a gently sloping site allows easy drainage of water. Areas prone to flooding (e.g. at the bottom of the valley or in riverine areas), or exposed to soil erosion (e.g. on a steep hill) should be avoided.
(v) Sunlight – sunlight is essential for plant growth. The nursery should permit adequate sunlight.
(vi) Shelter – there should be adequate shelter from cold or drying winds. Areas exposed to strong winds (e.g. at the top of a hill or in the middle of an exposed valley) should be avoided
¶ Layout of the Nursery
Instruction 34: The general layout of a nursery shall be arranged in such a way that the transplant beds are aligned in the East-West direction to avoid the drying effect of the sun along the long axis of the beds. The appropriate nursery layout shall provide for stores, potting shed, shade bandas, and adequate area used for the seed beds (SB) and transplant beds (TB). Figure 1 shows a typical example of a nursery layout [1].
Figure 1: Example of a Tree Nursery layout
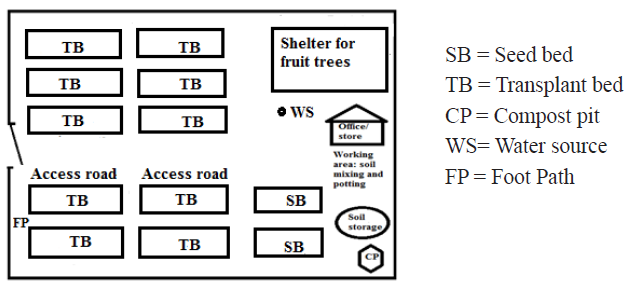
Source: Semalulu, et al (2017). The Sustainable Land Management Manual, Volume 1 final.
¶ Nursery Plan/ Calendar
Instruction 35: Nursery management shall be guided by a nursery plan prepared to ensure that operations leading to seedling production are carried out on time, including timely procurement of seed, nursery tools, equipment and material, nursery activities are implemented according to the calendar, and seedlings produced are of right size, quality, and in required quantities. The nursery calendar varies with species, depending on the time it takes between seed germination and when the seedling is ready for planting out.
Figure 2 shows a nursery calendar for Pine species, which takes about 4 months in the nursery, before being planted out. For the March-May planting season, the nursery activities start around September of the previous year with procuring seed. Some species like Eucalyptus take 2-3 months.

Source: Focus Group Discussion at National Tree Seed Centre, Namanve, Kampala
¶ Procurement of Tools, Equipment and Materials
The basic nursery tools include pangas, hoes, bowsaws, wheelbarrows, spades, rakes, and watering cans.
The common nursery materials are: soil (sandy loam soil, compost manure), thatching materials (e.g. grass, papyrus mats), poles, timber, nails, polythene tubing, fertilizers, pesticides, fungicides, etc. A tractor or pick-up may be purchased or hired for the transportation of nursery materials.
Instruction 36: Procurement of the tools and materials needed in the nursery shall be done well in advance for effective utilization of time and human resources and for optimum nursery productivity.
¶ Seed Bed Construction and Soil Mixing
Instruction 37: For a permanent nursery, provision should be made for a drainage layer which 30cm deep, and composed of stones as a base and covered by coarse sand. This will allow for water to filter through and thus, prevent waterlogging over time
Instruction 38: The function of the seed bed is to provide for the seed to germinate before transplanting. Generally, a seedling should be transplanted while it is still utilizing food reserves in the cotyledons, so the nutrient status of the seed bed mixture is not important. A 10 cm deep bed, of a mixture of equal parts of sieved forest soil and sand, or even pure sand, over a layer of coarse stone to improve drainage is adequate. No fertilizer is necessary. Sunken beds are recommended in hot and dry areas because of better water retention and minimizing heat), while raised beds may be used in wet areas.
¶ Sowing
Instruction 39: Sowing of seed shall take into consideration the seed size to determine the sowing intensity, depending on species. Seed shall not be sown heavily, because this would result in over-crowding and damping off. To avoid this, mix all fine seed (which includes eucalyptus, pines and cypresses) with sand, 2 parts sand to l of seed, at the time of sowing. The mixture is then broadcast carefully and evenly onto the surface of the seed-bed. Sand or finely sieved soil shall be used for the purpose, being evenly applied and then firmed with a flat board. Some seed, especially if it is large may be sown directly in the pot. The seed handling notes issued by NTSC provide necessary guidance on species specific sowing methods.
¶ Shade for Seed Beds
Instruction 40: Tree seedlings are delicate and tender in the early stages of growth and require shade for protection from harsh weather conditions. The shade may be provided through construction of a shelter above the seed bed or through mulching. Mulch is applied especially where the seed is tiny and normally sown on the surface of the earth. Mulching is also important for water retention and minimizing water splash.
¶ Watering Seed Beds
Instruction 41: Enough water shall be applied to keep the soil moist, but not too much to cause damping off. Water shall be applied through a fine rose or mist spray. Watering should be done during the cool hours of the day (before 9 am and after 4pm). Shading of newly pricked out seedlings shall not go beyond 10 days, otherwise the seedlings are likely to suffer damping off.
¶ Soil mixture for Transplants
Instruction 42: The complete soil mixture (including NPK or organic manure) shall be made two weeks to one month in advance of pricking out to allow time for organic material to break down and nutrients to become fully distributed (i.e. allow soil to mature). For raising pine seedlings, it is important to include mycorrhiza in the soil mixture to ensure early growth of seedlings. An amount of 0.1-0.2 by volume will be adequate (or 1 part coarse sand to 3 parts mycorrhizal soil: 10 parts top loam soil/forest soil). During the waiting period, the soil shall be protected from the sun and rain, and maintained in moist condition by occasional watering. To allow adequate time for “settling” the mixture shall be put into the pots at least 2 weeks before pricking out. During this time, weed seeds that germinate shall be removed.
¶ Potting
Instruction 43: Seedlings are pricked out into polythene pots or bags. These are in the form of 5cm lay flat size for eucalyptus and 10cm for pines. Larger sizes or empty milk pots may be used for hardwoods. The gauge generally used for large pots is 250, but experience seems to show that a lighter gauge, say 150, can be used. The pots shall be filled to within 3 cm. of the top with the standard soil mixture for the nursery. The mixture can vary from nursery to nursery depending on local conditions, availability of materials etc., but once a satisfactory mixture has been found it shall be standardised and laid down as such in the FMP, or the protocol for each nursery, together with the source of supply of each constituent.
¶ Pricking out Seedlings
Instruction 44: It is essential that seedlings are transplanted as soon as they are large enough to handle. This means, in most cases, one week after germination, or after they have developed 2 pairs of leaves for small sized species. A hole shall be dibbled in the centre of the potted soil, ensuring sufficient width to take in all the roots of a seedling. In lifting the seedling, the plant shall always be grasped by the root collar, seed leaves, or seed coat, never by the stem as this may cause damage to the tissues which in turn results in checking and the possibility of disease. If the seedling has been left too long in the seed bed, the tap root shall be cut back to prevent it being bent up in the hole. The whole operation must be carried out entirely under shade, and the workers themselves shall be under shade.
¶ Shade for the Pricked-out Seedlings
Instruction 45: Transplants require full shade for the first two to three weeks to protect them from harsh weather conditions, e.g. heavy downpour of rain or direct sunlight in the hot and dry months. The shade shall be progressively removed as the seedlings grow stronger, with half of the shade removed in the third week and after which no shade should be necessary.
¶ Watering Pricked out Seedlings
Instruction 46: For the first few days after pricking out, light watering only is necessary, similar to that given to a seed bed. Once the plants are established and fibrous roots are beginning to develop, the rate of watering shall start to increase gradually until, by about the middle of the dry season preceding planting, the twice daily rate has been stepped up. Fine roses shall always be used. As the shade is decreased the intensity of watering shall be increased. Even in a particular nursery, it is virtually impossible to lay down definite rules regarding the intensity of watering. The amount of water required by pots can only be judged by the condition of the soil at the time. Nursery workers shall be taught how to recognise a “nicely moist” soil by the feel and appearance, and instructed to carry out frequent checks to ensure that this condition is constantly maintained by appropriate watering. This should eliminate the common faults of over-watering young transplants and under-watering old transplants.
¶ Weeding, Mulching and Cleaning
Instruction 47: Once the pricked-out seedlings are well established the soil surface requires loosening at regular intervals to prevent it becoming compact. Weeding is carried out at the same time. Mulch shall be applied to the soil surface when the shade is fully removed, primarily to conserve soil moisture. A thick mulch is essential during the dry season. A variety of materials can be used for this purpose e.g. chopped leaves, chopped grass, charcoal, rotted coffee husks, wood shavings (not sawdust) forest litter etc. After cultivating the soil, the mulch will be applied liberally to form a complete cover 1 - 2 cm. thick. Any weeds within the seedling beds or along walk-ways should be removed and the area kept clean.
¶ Root Pruning
Instruction 48: Root pruning involves cutting roots of seedlings usually at the end of the rapid growth phase and during hardening off to prevent the roots from penetrating into the soil. About two months after pricking out, root pruning shall commence using a knife, wire, or scissors or finger nails to avoid roots growing into the ground. Root pruning stimulates the growth of lateral roots and root branching in the pots. However, root pruning causes stress to the seedlings due to reduced ability of the root system to supply water to the seedling. After root pruning, the seedlings must be watered well for 3-4 days to allow them to recover from stress.
¶ Hardening Off
Instruction 49: To prepare seedlings for the change to field conditions, a process of “hardening off” shall begin five or six weeks before planting out time. This involves gradually reducing the amount of watering and increasing the frequency of root pruning so as to bring growth of the nursery stock to a standstill.
¶ Protection of Seedlings
There are a number of pests and diseases that cause damage to tree seedlings in the nursery. The most common nursery pests include termites, cutworms, crickets, hoppers, weevils, chafer grubs, among others. The common diseases include dumping off, wilting and powdery mildew.
The most effective way to deal with forest pests and diseases is applying integrated pest management practices (Section xxx).
Instruction 50: A fungicide such as “Tulisan” or “Kaptan” may be used as routine measure in all nurseries to combat dumping off. The fungicide shall be watered onto the seed bed before sowing and at weekly intervals. However, the best protection is thin sowing and avoidance of too much watering. “Perenox” or other copper-based fungicides shall NOT be used on acid soil or transplant beds because it inhibits root growth.
¶ Environmental Health and Safety in the Nursery
Instruction 51: Nursery managers shall implement health and safety practices to protect workers from occupational safety and health hazards. Workers shall be provided with personal protective equipment (PPE) appropriate to their assigned tasks [2]. The use of the PPE is aimed at ensuring the protection of the head, hands and feet against any impact, eyes and hands. The basic protective gear in a tree nursery includes gumboots, gloves, gowns, face shields or masks, and helmets.
Instruction 52: All waste materials in the nursery shall be disposed of in an environmentally appropriate way [3]. There shall be appropriate disposal arrangements. Polythene and plastic can be collected and sold for recycling. Domestic biodegradable waste can be taken to public landfills, or the nursery can even establish its own landfill, pit latrines for human waste, conversions into fertilizer, etc.
Semalulu, Onesmus & James, Higenyi & rusoke, charles & Namayanja, Diana & niyibizi, george & etc,. (2017). The Sustainable Land Management Manual, Volume 1 final ↩︎
Forest Stewardship Council, 2017. FSC National Forest Stewardship Standard for Uganda, Criterion 2.3 ↩︎
FSC National Forest Stewardship Standard for Uganda. Criterion 10.12 ↩︎